Mini Lemon Cheesecakes

I wanted to make my boyfriend’s birthday perfect. I went all out with banners, balloons, confetti and a pile of beautifully wrapped presents but as a baker, I knew the showstopper had to be the cake. Dilemma… his favourite dessert is cheesecake but I wanted to make him an actual birthday cake… Solution… MAKE BOTH! The result… A rum and raisin cake surrounded by mini lemon cheesecakes.

DSC_0837

I’m so glad that I decided to make both, he was so excitable all day and we gorged ourselves on cake throughout the day. Better start planning now to top it for next year!

I found this recipe for individual cheesecakes but I wanted to give them a real punch of lemon flavour so I omitted the raspberries and substituted the lime zest for lemon. I also used this recipe to make a batch of lemon curd, which I topped the cheesecakes with and there was plenty left over for smothering toast – yum! (Such a hard life when there are leftover goodies that just have to be used up isn’t it?)

DSC_0841It may look like there’s a fairly thin layer of curd on top but because the lemon is so tangy in the curd and so subtle and creamy in the cheesecake, it’s the perfect amount to compliment each other. I also substituted half of the digestive biscuits for amaretti biscuits for an Italian twist and hint of almond.

Gone Crackers!

 DSC_0826   So we’re in the second week of the Great British Bake Off and it was biscuit week! That and my boyfriend and I had the sudden and insatiable need to eat cheese and crackers one evening led to my first attempt (and of course, experimentation) at making crackers! I decided to use a basic recipe for crackers and add different flavours. The recipe I chose was:  

http://www.thekitchn.com/how-to-make-crackers-at-home-cooking-lessons-from-the-kitchn-186144

It proved to be a great basic recipe, although I think next time I’ll roll mine slightly thinner to get more of a snap when you bite into the cracker. I tested multiple toppings including sesame seeds, smoked paprika, garlic salt and parmesan and olive. The parmesan and olive worked particularly well, as did the garlic salt; I think the latter would work best with cheese. I’ll definitely be trying this recipe again soon to perfect my favourite cracker!

DSC_0831

Rum and Raisin Shortbread!

Apologies for the recent hiatus; I won’t bore you with the details but let’s just say a break up and a fire are just highlights of what has turned my life upside down over the last few months – there’s been more going on than in a soap!

Anyway, more importantly, I have discovered spiced rum… It’s such a unique taste and really stands up well in baking. I’ve been making shortbread a lot recently and it’s one of my boyfriend’s favourite things for me to bake. His favourite ice cream flavour is rum and raisin and one day, I suddenly thought about combining the two and thus, rum and raisin shortbread was born! I soaked the raisins in rum before putting them into the shortbread and then used the leftover raisin rum to soften fudge and then drizzled the fudge over the base of the biscuits to add a little extra! These are so popular, I get asked to make them all the time; they’re smooth for a shortbread and everyone just loves them; give them a go yourself and see! (Please excuse the photo, it was only a quick snap and they were eaten too quickly for me to take proper photos!)

Rum and Raisin Shortbread

Ingredients

225g unsalted butter

100g caster sugar

225g plain flour

1/2 teaspoon baking powder

1/4 teaspoon salt

185g raisins (I use a mix of golden and flame raisins but any will do)

Spiced rum (enough to cover the raisins in the pan)

Ready made, soft fudge (amount depends on how much fudge you want on each biscuit)

Method

  • Place the raisins in a saucepan and add the spiced rum so that it almost cover the raisins.
  • Preheat the oven to 150C/Gas 2
  • In a bowl, cream together the butter and sugar until fully incorporated and fluffy.
  • Mix together the flour, baking powder and salt in a separate bowl. Gradually stir the dry ingredients into the butter and sugar mixture.
  • Remove the raisins from the rum and stir them into the biscuit mixture until equally incorporated.
  • Roll the dough into walnut sized balls and place on ungreased baking trays about an inch apart to allow for spreading. Flatten the biscuits slightly.
  • Bake for 15 to 20 minutes until they no longer look wet but are only just starting to brown at the edges.
  • Remove from the oven and let them cool for about 10 minutes on the tray and then remove to a wire rack to cool completely.
  • Whilst cooling, place the fudge in a saucepan over a low heat and place about a tablespoon of the raisin rum over the fudge. Allow the fudge to melt completely and add more rum to taste.
  • When the biscuits are cool, turn them over and drizzle the liquid fudge over them.
  • Allow the fudge to harden slightly and then enjoy!

Image


Turtle Cheesecake (and no it’s not made with turtles!)

Who doesn’t like a good cheesecake? I am certainly addicted to them but for some reason, I’ve never tried to make one. However, this all changed when the guys at work kept talking about how much they love cheesecake and how I should make one. I’d recently read a blog post over at the brown-eyed baker about a turtle cheesecake that consisted of oreo base, caramel and pecans, vanilla cheesecake and chocolate ganache. The moment I mentioned this to everyone at work, they insisted on me trying to make it and wow am I glad I tried.

This is undoubtedly the best cheesecake I have ever eaten and my colleagues definitely agreed. An oreo base is always a great start to a cheesecake but this cheesecake was so decadent and delicious. The vanilla cheesecake was smooth and flavoursome and I thought that the combination of such rich elements would be too much but it wasn’t, the balance was exactly right and I could definitely easily eat a whole slice. For those of you who are a bit confused about the name, I was too when I first read it because in the UK, we don’t have turtle sweets! All I know is that turtles are American sweets that look like turtles and consist of caramel, nuts and chocolate. Don’t worry, it’s not real turtle!

Image

I used the recipe here.

It was time consuming but was simple to do and definitely worth the effort. You really won’t regret making this. I used a ready made caramel sauce though instead of making a salted caramel because I didn’t wanted salt in mine and it still worked really well.

Definitely, try this!!

Flapjacks!

Image

Both my mum and my boyfriend absolutely love flapjacks so they are requested fairly often wherever I am! Given that I was making so many, I decided to develop my own ultimate recipe for flapjacks. Unfortunately, my mum and boyfriend both loved completely different types of flapjack so now I have two perfect recipes!

Image

This recipe is for the gooey and thick flapjack, with a strong demerara flavour, rather than the thin, crispy flapjack with a strong syrup flavour. These are quite rich but always very popular and they’ve been featuring in our lunchboxes all week and proved rather popular at work too! They are so easy to make as well so if you like flapjacks, definitely try this recipe.

Flapjacks

Ingredients

300g butter

340g demerara sugar

4 serving spoons golden syrup

1/2 tin condensed milk

500g good quality oats

Method

  • Melt the butter completely in a saucepan over a low heat.
  • Add the sugar, by sprinkling into the butter to avoid lumps, and melt into the butter completely.
  • Add the golden syrup and mix.
  • Add the condensed milk and mix.
  • Fold in the oats and leave to soak slightly. Ensure that all the oats are covered in the syrup mixture and that the sugar is completely incorporated.
  • Pour mixture into a lined baking tray, don’t squish down.
  • Bake at 160C for about 15 minutes, until it is just brown around the edge and wobbly in the middle.
  • Score where cuts will be but don’t take it out of the pan yet.
  • Leave to cool and then, enjoy! Image


Cinnamon Roll Doughnut Pie! Oh yes…that’s what I said.

Image

So, recently I made mini cinnamon roll doughnuts and they seemed to be a rather popular blog post! They were also very popular with me; bite size, full of flavour, fluffy and fresh! My love of these mini delights got me thinking about how I could develop this recipe and make it even better. I’ve recently been watching ‘Unique Sweets’ and it really inspires me to try to make something a bit different. I saw one that visited Momofuku milk bar and they make some very interesting pies, such as the crack pie and grasshopper pie, they looked incredible. Hence, the idea for cinnamon roll doughnut pie! A shortcrust pastry crust, cinnamon roll sauce, topped with doughnut batter packed full of chocolate chips to give it that extra flavour and texture.

ImageI was actually surprised at how well this turned out and how addictive it was. The doughnut layer was a little thick but still fluffy and flavoursome. I think when I make this again, I will extend the pastry out to the sides of the case to give it that extra bite and I will put in more sauce to ensure that you always get a kick of cinnamon in every bite.

This pie was really something new that I’d never tried before and it was still so simple; give this a go!

Image

You can find the basic recipes for the sauce and doughnut batter here or here. You can buy shortcrust pastry if you wish or use any simple recipe to make your own, which is always better and more satisfying, I find.

As for assembly, I simply lined a greased pie dish with pastry, added a little semolina to the base, followed by the cinnamon sauce. I folded 200g chocolate chips into the doughnut batter and gently spooned this on top of the cinnamon sauce in the pie dish.

I then baked the pie at 180C for 20 minutes and turned down the temperature to 150C and continued to bake the pie until a skewer inserted into the doughnut layer came out clean. Don’t worry about the edge browning slightly but it shouldn’t burn.

Image

Mini Cinnamon Roll Doughnuts!

Image

  I think I’m definitely going to become addicted to making mini doughnuts with my new mould; I’ve only had it for a little over a week and I’ve already made four batches! This batch was by far the best. The fusion of the cinnamon roll and the doughnut was inspired but the fact that they come in bite size portions just makes them even better! I think I’ve eaten about 12 now…is that bad?

Image

They were incredibly easy to make and didn’t take too long either. If some of the cinnamon mixture gets stuck in the mould when you turn out the doughnuts, don’t worry! I personally preferred the doughnuts that had slightly less sauce on because the balance between the amount of sauce and the doughnuts was much better. Be careful when adding the melted butter to the milk and egg mixture though because it can curdle very very easily. I cooled the butter, warmed the milk and egg slightly and added the butter very slowly whilst whisking to avoid curdling and that seemed to do the job.

Image

I used the recipe from a friend of mine’s blog, Mess Makes Food. If you haven’t seen her blog before, you need to! Some truly inspiring recipes combined with fun writing and beautiful photographs, you should really have a look! You can find the recipe here. The only deviation I made was dropping a few drops of vanilla extract into the doughnut batter as well as the cinnamon sauce.

You should definitely try these little bites; they are gooey, soft and full of cinnamon flavour and when they’re this simple to make…why not?

Image

Mini Doughnuts!

Image

I have a new mini doughnut mould! What fun I’m having with it as well. This recipe is a little too easy and uses ingredients that I generally have around the house so it’s going to prove far too easy to make them all the time and create lots of different variations.

Image

Bite-sized bits of baked goodness; who could resist fresh, warm, home-made mini doughnuts? Not me, that’s for sure. Every time I passed the plate, another doughnut disappeared. I made the same basic batch of doughnuts but then dipped some in a mixture of cinnamon and sugar and dipped one side of the left over doughnuts in melted nutella.

Image

I have to say, the nutella version was my favourite and they were gone within the hour. The rich, hazelnut spread worked perfectly with the subtle vanilla taste of the doughnut and I couldn’t resist.

Image

I used the basic recipe for the doughnuts from the Lakeland website here

The recipe offers the choice of using olive oil or melted butter and I tried both. There were advantages and disadvantages to both versions I think. If you don’t have much time, use olive oil because it’s incredibly quick and easy. If you have more time, tried the melted butter version as I think it gave slightly more flavour to the base doughnut. However, if you choose the melted butter version, be careful when adding it to the milk and egg because the difference in temperature can curdle the milk and egg. To avoid curdling, you need to get all of the ingredients to the same temperature. I did this by letting the butter cool slightly after melting and by warming the milk and egg mixture slightly in the microwave. If you can use butter though, DO! I felt the doughnut really benefited from butter but frankly, what doesn’t benefit from having more butter?

Image

I’ve never really been a fan of the new silicone craze but I may be a convert after using this excellent doughnut mould. The silicone made it so easy to clean, grease and remove the doughnuts but they also kept their shape very well, which is the problem I usually have with silicone moulds. For £5, it was definitely worth the investment and I will soon be trying out plenty of new combinations and variations of doughnuts so watch out for them!

Image


Pecan Pie Please!

Image

Oh I do like a good pie! I thought that my recent trip to America would have been full of them but sadly, it was not! The severe lack of pie meant that my craving had not subsided by the time I got home. Hence, the creation of this delicious pecan pie!

Image

I adapted the recipe for this pie from Mary Berry’s version and the main difference is that her recipe calls for brandy, whereas I use Southern Comfort. Pecan pie screams the south to me so I thought I’d try this combination and it worked wonderfully well! I use half the amount as well so as not to overwhelm the flavours of the pie but it still gives a kick of real southern flavour.

Image

The combination of flavours and textures in this pie is perfect… Rich and sweet from the brown sugar and golden syrup, brought back to Earth with toasted pecans and all surrounded in buttery, crisp, homemade pastry – nothing beats homemade. The coupling of crunchy and smooth textures keeps the mouth watering and wanting more and this pie only has one slice left – I’m sure even that won’t last long!

Image

Pecan Pie

Ingredients

150g pecan halves

30g unsalted butter

60g light muscovado sugar

30g caster sugar

125ml (or roughly 8 tablespoons) golden syrup

1 1/2 tablespoons Southern Comfort

1 teaspoon vanilla extract

2 tablespoons single cream

1/4 teaspoon ground cinnamon

pinch of grated nutmeg

1 large egg

2 egg yolks

For the pastry:

175g plain flour

90g chilled butter, cubed

roughly 2 tablespoons cold water

1 egg white, lightly beaten

Method

  • Make the pastry by putting the flour and butter into a bowl and rubbing the mixture between your fingertips until the mixture looks like breadcrumbs. Add enough water to form a soft dough and leave to chill in the fridge for roughly 30 minutes.
  • Preheat the oven to 180C. Roll the pastry out on a lightly floured surface and line a buttered flan tin with the pastry. Bake the case blind in the preheated oven for 10 minutes.
  • Remove the baking beans and baking paper or foil and lightly brush the pastry shell with the egg white. Return to the oven for 2 minutes.
  • Whilst the pastry is chilling, toast the pecan halves in a preheated oven at 180C, turning occasionally to avoid burning, for 10-15 minutes. Remove from the oven and once slightly cooler, reserve some of the halves and chop the remaining pecans roughly.
  • Put the butter into a saucepan and melt on a medium heat until it turns golden brown. Add the sugars and golden syrup and heat gently until the sugars dissolve. Add the Southern Comfort, bring to a boil, and cook for 5 minutes.
  • Remove from the heat and stir in the vanilla extract, cream, cinnamon and nutmeg.
  • Whisk together the egg and egg yolks in a separate bowl. Whisk a little of the hot syrup into the eggs. Add half of the syrup, a little bit at a time, then add the remainder. Leave to cool.
  • Arrange the chopped pecans and pecan halves in the pastry shell, reserving some for decoration if desired. Pour the syrup and egg mixture over the pecans and place the decorative pecans on top.
  • Bake in a preheated oven at 180C for about 40 minutes until golden brown and set. After 25-30 minutes, you may need to place a piece of foil lightly over the pie to prevent the pastry from burning. Leave to cool before serving but you can reheat individual slices to have warm pie if you wish. I have a warm slice of pie with a scoop of vanilla ice cream and the combination offset each other perfectly. Image

Back to baking, baring cookies!

I’ll open with an apology; I haven’t been able to blog for so long and I’ve really been missing it but I have a legitimate excuse, I promise! I’ve just completed my University degree AND moved house! I know, what a brilliant idea to do both at once. The last few months were pretty hard work and rather hectic and I’ve spent the last few weeks in America so haven’t been able to blog then either. The good news is that I’m home now and I got a First for my degree so I’m a rather happy bunny and baker. Anyway, back to baking!

I decided that you all needed a rather…tempting recipe for me to return with and so I invented something especially for all of my lovely readers. It’s got nutella, it’s got oreos and oh yes, it’s stuffed with milk duds. Who could resist?

Image

Tempting? I think so. They ended up with a rich vanilla flavour with sudden blasts of nutella and a random crunch of oreo. I stuffed one milk dud into the middle of each cookie so that the caramel would melt inside the biscuit and it resulted in a stringy, gooey mess but with a silky texture and golden caramel flavour.

These cookies were perfect warm and fresh from the oven with a glass of cold milk.

Image

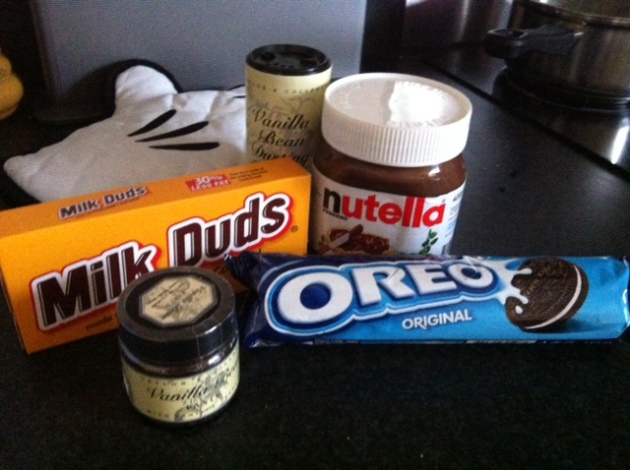
I brought a box of milk duds back from America because they’re about a quarter of the price over there but I wasn’t quite sure what to do with them without eating the whole box and breaking my teeth in the process. “Why not stuff them in cookies?” the rather hungry baker thought, and as you all know, a hungry baker is not a good idea because they produce the most ridiculous but delicious recipes. The hunger did not subside however and the milk dud stuffing became a reality.

As if milk dud stuffed chocolate chip cookies wouldn’t have been enough, I decided to add nutella and broken oreos into the mix as well.

You may recall me being giving some vanilla bean paste for Christmas and as of yet, I haven’t found a way to use it. I decided to try substituting my usual use of vanilla extract for the same amount of vanilla bean paste to see if it gave a more intense taste but if you don’t have any vanilla bean paste available then extract is absolutely fine. I do think it added a more intense and genuine flavour to the cookies though and if nothing else, it smelt divine whilst baking. If you can’t find milk duds either, you could try using toffee poppets or perhaps rolos.

Image

Nutella, Oreo and Milk Dud Cookies

Ingredients:

115g butter

50g caster sugar

110g soft brown sugar

1 egg (beaten)

1 teaspoon vanilla bean paste (or vanilla extract)

150g chocolate chips

1 tablespoon Nutella

4 broken Oreos

155g plain flour

Pinch of baking powder

8-12 Milk Duds (or toffee poppets or rolos)

Method:

  • Preheat the oven to 185C (170C for fan assisted ovens) and line a large baking tray with greaseproof paper (you may need two).
  • Cream the butter and sugars together until completely incorporated, light and fluffy.
  • Add the beaten egg and vanilla and mix well (the paste requires more mixing).
  • Add the chocolate chips, nutella and oreos and mix well to ensure that these ingredients are equally distributed throughout the mixture.
  • Mix in the flour and baking powder until there is no residue left on the side of the bowl.
  • Roll an amount into a ball and place on the baking tray. Make sure that you leave plenty of space in between each ball because these spread enormously.
  • Place in the oven and bake for around 10-12 minutes; they will still look soft and gooey but they will harden as they cool and who doesn’t like a gooey cookie? If you leave them in for too long, the edges will burn or at least go crispy. Once they are out of the oven, leave them to harden slightly on the tray and then transfer them to a cooling rack if there are any left after you try them warm!